Search My Blog

Thursday, December 20, 2012

Juicing to Perfection

Smartphones nowadays have become incredible juice-sucking devices. Manufacturers are squeezing more and more features into phones to the point where conventional lithium ion battery technology is struggling to keep up.

I managed to get hold of one of these ‘power banks’ which are really just big batteries that hold a lot of charge and can be set to charge mobile phones and other devices. I got myself a Sony-branded one.

Here is how it looks like:


Now it’s time for me to get a shorter charging cable.

20121015-053127 PM.jpg

English as it is Broken

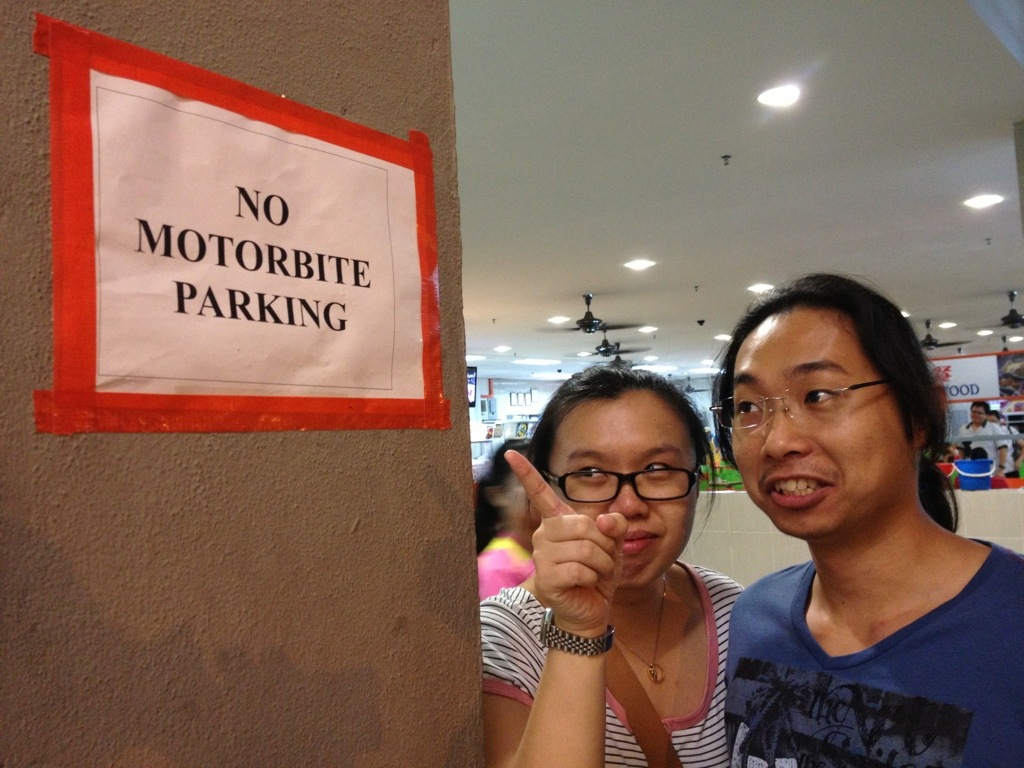
English as it is broken. But I think that whoever wrote this had indeed taken that whole ‘broken’ thing to the next level.
20121015-122958 AM.jpg
I don’t expect to see any ‘motorbites’ parked there anytime soon.

Wednesday, October 10, 2012

Instagram Madness

The iPhone proved to be a very capable photographic tool, and when Instagram came along, it redefined the smartphone as not only a tool for recording visual information, but one for sharing them as well. Here are some pictures taken with Instagram.

Sunday, August 19, 2012

Concert Photography - My First Attempt

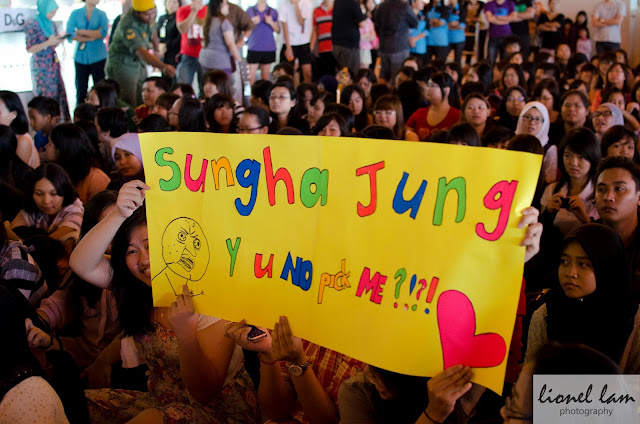
Concert photography is not something everyone will enjoy, but for those who wish to take a first step in this direction, having the right preparation is necessary. My first attempt at concert photography was a little while ago, when I was shooting under Wedding Celebrations Studio for Sungha Jung's concert at the Kuching International Airport. Sungha Jung was brought in to perform by Borneo To The World, a soap maker and newly-opened retailer at the airport. I would personally think their marketing strategy proved extremely successful, at least judging by the size of the crowd and the attention they were getting.


I only had two hours to prepare. A quick poking-around the web returned some interesting results on what gear to bring and what to expect during the event.

 Listed below were the items I brought along. Because I anticipated I might be moving around quite a bit, I decided to pack light.
  1. Camera: Nikon D7000
  2. Nikkor 35mm f1.8 DX.
  3. Nikkor 18-105mm f3.5 - 5.6 DX
 I presume that the above setup would be largely dependent upon the type of concert photography (Yes! There are sub-genres!) you decide to get into, but having a fast prime would be mostly adequate as most concerts are set in venues with low ambient lighting. Having a camera body which can shoot at 'stupid high' ISOs (as Ken Rockwell put it) would certainly be an advantage. You may have also noticed that I did not include a flash. This is because flash photography is often not allowed, or even if allowed, it may be restricted to certain settings and under specific circumstances.

The truth is, you don't really need to have cutting-edge gear. Having a eye for good composition and some luck should suffice for most people. Below are some photos taken during the event. Click on the pictures to view the EXIF data.


If there was something important I learned about concert photography, it is about photographing minute and often-overlooked details. It is these things that help convey and express the persona of the subjects being photographed.


If it was hard working when the ambient lighting was too low, then it was even more challenging when you have distracting elements constantly creeping into the frame. A quick fix would be to get closer to your subject and have it fill the frame, thus pushing out all the distracting elements. Converting your photos to monochrome helps too.


Shown below is another version of the above photo, but in full color. At this point, you may notice that when the photo is rendered in black and white, we tend to focus on the texture and outlines of the subject.


Having your gaze fixated solely on to the performer(s) will tell little about the surrounding. I decided to include a bit of the audience in the above frame to give the picture a bit more impact. Shown below are a few more examples. This is a good way to 'throw' the viewer right into the heat of the action.


Friday, June 8, 2012

Metering Basics

Hi everyone! I've included in the how-to section above my latest article on metering basics. In this article, I will explain the three fundamental metering modes available in most digital cameras out there in the market. Please leave any feedback in the comments below. Happy reading!

Lionel

Sunday, June 3, 2012

Photography Notes for the Rest of the World

It's been a while since I updated my blog, due to my hectic schedule. It is not easy juggling many tasks at a time, especially when you have to work 14 to 18 hours a day. It's not easy being an entrepreneur. Sometimes I wonder what keeps me going.

Anyway, I digress. I've recently managed to squeeze in a bit of time doing some write up on my iPad (Pages for iOS is AWESOME), especially since the 'right idea' inevitably pops out when I least expect it. Having a pen and paper at this time would certainly be great, as my sometimes quirky nature to multitask often means what I have in 'active memory' gets blown out of the window, but having an iPad to lug around is certainly the 'in' thing, but...

LIONEL! Stop writing nonsense!

Ok ok..so back to the topic.

I have decided to spend some spare time sharing my knowledge in photography with the rest of the world and what better way than to have them downloadable as PDF files right? I have added a 'How-to' section which you can access from the menu bar just above. If you have any suggestions on how to improve the articles, please do leave a comment below.

Sunday, April 22, 2012

Raw vs Jpeg Part 2

In my previous blog posting, I mentioned about the differences between shooting in Raw and JPEG, as well as some the pros and cons between the two.

In this posting, We will be doing a side-by-side comparison between a JPEG image and a Raw conversion.

Comparisons will be done at 100% crops, so you can see how well Raw files retain fine details.

Conversion of Raw files will be done with ViewNX 2.

JPEG Output (Click to Enlarge)

Monday, March 5, 2012

Happy Birthday to Me!

Today, I turn 26. Finally, I am officially MORE than a quarter of a century old. So there is enough compelling reason to celebrate on a grander scale. I hadn't had a birthday celebration for quite some time.

Too bad Leonard is not around this time. But he's probably having the time of his life in Penang.

The last time people actually took my birthday seriously was, well, nearly 20 years ago. Donkey years ago eh?

For dinner, we had..
Home-made pizza. Best in the world!

Fried chicken...
...lots of it

And of course, no celebration is ever complete without...


Time to resume my oat breakfast diet again...


Wednesday, February 29, 2012

The K.I.S.S.R Principle - Composition Basics


Till this very day, I am a firm believer that composition is the key to any outstanding photo, regardless of the camera or gear you use. Saying that your equipment is not sufficiently good for taking breathtaking shots is merely conjuring excuses to be lazy. Needless to say, your camera is just a tool, and you should use your tool to the best of what it allows you to do, limited only by your creative potential.

So what then is this thing calld the  K.I.S.S.R principle? It stands for 'Keep It Simple Stupid...Really'. If you have noticed, those pictures we see in photography magazines that have the 'pop' tend to keep composition down to a bare minimum. Needless to say, one of the fast way to learn how to take good picture is to observe how other experienced photographers do it. For a start, a good place to start looking is Flickr. Take time to observe their photos. Besides Flickr, another good place is Facebook, because Facebook is flooded with brilliant examples of horrible photos that are painful to look at. Seriously. What we need its a means of learning from both the best and the worst. Knowing how to take 'horrible' photos is a good start to learn how to avoid the pitfalls of other photographers.

In this article, I will outline some of the compositional techniques employed by experienced photographers. Please not that these are merely aids, and like most rules out there, are meant to be broken. For the purpose of simplicity, I will not go though other compositional aids such as the Rule of Thirds as there are plenty of topics about it on the Internet.

Simplicity
Keep your composition as simple as possible. Composition is the technique of arranging subjects in a picture. Ideally, try not to have more than 3 subjects in a photograph. Having too many subjects dilutes the context. In photography, less is usually more.

Context
The context of a picture is the part of the picture that tells a story. A good picture is one that has a punch line. In other words, one look at a picture and it should tell you something about it straightaway. A good way to preserve and enhance the context of your photo is to arrange the subjects in the frame such that they tell a story. For example, a lone silhouetted figure sitting on sandy shores of a beach overlooking the sunset can make for a striking photo. Ask yourselves questions like, "What is it that I like about this?", or "Why am I taking a picture of this?". A good photo always has a strong but simple punchline.

Colors
Look out for color themes when framing your shot. Different colors tend to convey different mood. Does the color of your main subject stand put of the crowd? Or does your subject blend into the rest of the scene? Does the scene look better in monochrome? Red tends to communicate warmth, energy and force. Green symbolizes freshness, youth and vitality.

Texture
Texture is important in conveying information about the nature of materials. Without texture, everything will just look plasticky and boring. Everything would be just blobs of color with nothing much to tell.

Contrast
Contrast in this sense is subjective, because it can be contrast in term of color, subject, context and even texture. What good is contrast if it can be so subjective? For a start, contrast helps us to get things noticed. Think of the red-dressed girl in a crowd of black-suited executives crossing at a busy intersection, or the wrinkles on a grandmother's face, as she hugs her 3 year old granddaughter. These are just examples of how contrast can be put to your advantage.

Harmony
Harmony is the opposite of contrast. While harmony is similar to contrast in that it applies to the choice of color, texture and context etc. , harmony is different in that it is about similarities. Think of the lush green forest and all the shades of greens in between. Harmony is about conformity and control.

Mood
This is a tricky one. It is a cocktail of the above-mentioned points and matter of personal taste and understanding of the context of the situation.

The Wrap Up
Composition is a very much neglected topic by many beginning photographers. Newbie photographers often get stuck at figuring how their cameras work, and are too concerned about which settings to apply, or which lens to use. All this can be distracting and can likely be discouraging when you do not get the intended result. Instead of taking too long to figure what ISO or aperture, or shutter speed to use, photographers are encouraged to focus on the subject to be photographed. This is not to say that it is not important to know how your camera works, but that you should not be distracted by it. That being said, leave all the technical mumbo-jumbo at home and put on your creative thinking cap when you are on the field.
Wednesday, February 22, 2012

Fairy Cave Revisited


It had been quite a while since the last time I set foot in Fairy Cave. The last visit there proved somewhat fruitless due to the fact that I relied solely on my camera's high ISO capabilities to shoot in near pitch dark conditions, for forgetting to bring my tripod. The ensuing result were photos that were a little on the soft edge due to extensive in-camera noise removal.
Photographing the interior of the cave proved more difficult than the last time. Not only was the light intensity lower, but it has only just stopped raining and it was so extremely humid inside! Imagine the viewfinder fogging up each time I looked thought it! And the stench inside the cave was oh so unbearable too.

But I digress; complains aside. The stuff I brought along with me were:
  1. Canon EOS 500N film SLR.
  2. Nikon D7000, my trusty companion.
  3. My tripod, with plastic socks made from cut up plastic bags. (I couldn't bear the idea of bat's s**t sticking onto the legs of the tripod :) )
  4. A small torch, which really was the flash of my mobile phone.

Perhaps the most difficult aspect of photographing the cave was that there was not enough light to judge my composition, thus making the right judgement very difficult if not impossible. The low light also made it difficult to autofocus. Thank goodness the Nikon had all 39 autofocus points doing their magic.

Another thing about the lighting in the cave was the heightened contrast between the dark and light areas. It was virtually impossible to have a single exposure capture the entire range of light so I took several exposures, ranging from 30 to 2 seconds, and made a HDR image out of them. Shown above is an HDR composite image.

Keeping the camera still during the long exposures was one thing considering that my tripod was a flimsy and cheap one. The last time I took it out for some night shoot it literally swayed in the wind! In the cave, it was not so much of a problem with the wind, but I was hoping to have a tripod that could hold kilograms of gear without worrying that it will tip over, especially when you can't see that we'll in the dark.

Here are the individual Jpeg images before I combined them to form a HDR image.
 

Exposure: 25 seconds. Aperture: f/5

Exposure: 10 seconds. Aperture: f/5

Exposure: 5 seconds. Aperture: f/5

Exposure: 1 second. Aperture: f/5

Exposure: 30 seconds. Aperture: f/5. Deciding I needed a bit more texture and detail for the cave's floor, I decided to lengthen the shutter duration.


And here are the HDR images.

The cave interior
The outer 'chamber' of the cave, overlooking a sky-roof.

Film or Digital?

It's been a while since the last article I wrote on JPeg or Raw - Part 1, and now we have yet another debate to bring to the table. It is a wonder as to why the topic as to which one, film or digital, has, till now, been a subject of much heated debate. A little bit like comparing apples to oranges perhaps? Let us have a look at some key differences between film and digital, and in a while, we will study the advantages and disadvantages of each.

A recent film photograph of my dog chewing an old slipper

A Short History of Film
Film has been around for so long, that it has been subjected to many many years of innovative breakthrough. It all began when Louis Daguerre who developed the first practical photographic methods, called 'Daguerreotype', which involved the use of sensitized silver-plated copper (the 'film') and fumed with iodine vapor. Exposures were extremely long, as long as eight hours! This proved to be somewhat impractical but was used to capture landscapes. The process and chemicals involved were adapted and improved over time. In 1839, the rights for the daguerreotype was sold to the French government.

Fast forward to 1889, George Eastman, founder of the Kodak Company, invented the roll film. The rest was history, and film continued to dominate for more than a century.

The Digital Revolution
The early digital cameras in the market were simply horrible, suffering for a myriad image-quality issues, resolution being one of them. However, in years that followed, tremendous improvements were made in digital imaging and digital has come to be the medium of choice for professionals. Improvements were made in terms of resolution, dynamic range and color, just to name a few.

Film versus Digital

To say that digital has somewhat 'caught up' with film would be far from the truth. In order to draw a fair comparison, you need to first see the big picture. I have decided to split the pros and cons into a few sub-categories. For the sake of simplicity, I will only talk about the qualitative aspects of film and digital.


Comparison:
Detail Retention:
Film: Better at retaining detail, albeit grainier than digital, regardless of ISO sensitivity of film used.
Digital: Smooth and buttery texture. In other words, very clean images at the lowest ISO sensitivity. Loses some detail through interpolation and other internal processes, which vary according to make of camera.

Film grain is more evident in film and is especially noticeable in enlargements. Notice how well detail is preserved.


Dynamic Range:
Film: Superior dynamic range to digital. Film overexposes gracefully, and does not blow out to white (as in digital).
Digital: Dynamic range somewhat limited, and causes highlight 'clipping'. However, tremendous improvements have been made in this area in recent years.


Better dynamic range translates to better handling of extremely bring and dark areas


 Resolution & Image Quality
Note: This one is subject to some degree of controversy, because it is one of the most misunderstood. The hype created by the marketing departments of many camera makers led us to believe that resolution, in megapixel terms, was a measure of how 'good' a camera is. In other words, we were led to think that 'more is better'. Today, most of us know that is hogwash. The definition of resolution versus image quality is thus a complex one because a myriad of processes go on in a digital camera that determines how 'good' an image will turn out to be. To put it quite simply, two cameras can spit out images of the same resolution, but the quality may not be the same because different cameras may employ different image processing technologies. For the sake of comparison, I will do a basic comparison in lieu of detailed analysis.
Film: Resolution is virtually infinite, on the film itself at least. Putting a 'megapixel' cap on film would be an insult to a hundred years worth research and development that has gone into perfecting it. The quality of the final image will depend a lot on the equipment used (film scanner, enlarger, focusing lens), and of course, the size of the medium (in this case, the film). It is worthwhile nothing that while film has more grain (see the above, on 'Detail Retention'), it (the grain) plays an important role in the aesthetic quality of film.
Digital: Resolution of a digital sensor is finite. A digital camera that is rated to have '16 megapixels' will produce an image that is composed of those number of pixels (usually an approximation of that figure). Digital images tend to be 'smooth' and 'silky' in texture, with grain usually almost absent at the lowest ISO settings. The camera's processor may perform additional image processing such as noise reduction, which smudges texture and fine detail, making the 'megapixel race' somewhat irrelevant at this time of writing.


Post-Processing
Film: Besides the traditional dodging and burning, 'editing' film was a difficult procedure and was often performed by skilled individuals.
Digital: It has never been easier to get creative, with Photoshop and a whole array of digital tools at your disposal.


Conclusion
To sum it up, comparing film with digital is really like comparing apples to oranges. Each has it's share of advantages and disadvantages. The choice between film and digital is a matter of personal preference. The aesthetics of film can be difficult to reproduce in digital format, but digital photography has made the hobby more popular hobby than ever before.

Wednesday, January 18, 2012

JPEG or RAW? (Part 1)


JPEG or RAW? It seems that this is an ongoing debate with no clear conclusion in sight.

While doing a photo shoot for a commercial project recently, I had to decide whether or not to shoot in raw. Being somewhat of a purist, I used to abhor the idea of shooting in raw because I didn't like the idea of spending too much time with post-processing work. I believed that it was better to get most of the work done right out of the camera.

After all, you can't do much 'editing' on film right?

Wrong.

Ansel Adams developed his zone system to push the dynamic range of film to the limit. For that given reason, the same could be done on a 'digital negative', which is what the raw format sometimes called.

There are several advantages to shooting in raw:
  • Shooting in raw gives you more latitude in adjusting the image in post production.
  • Raw images are actually 'raw', unprocessed and uncompressed data collected right off the CCD or CMOS sensor of your camera. Because the data is in its purest form, it is virtually devoid of heavy-handed compression and noise-removal, usually done by the camera's CPU, which is necessary to produce Jpeg files.
  • Images generated from raw files tend to retain finer details because the processing is done by your computer, and not your camera's processor.

Shooting in raw has its drawbacks as well:
  • Large file sizes means you must be prepared to swap memory cards often, unless you have one of those cards that can store a trillion images (just kidding!).
  • Raw files cannot be read without proprietary software. In other words, raw files are 'non-standard', which means they vary according to the choice of camera model and manufacturer. In order to read these raw files, you will need to use the software that comes bundled with your camera. Adobe's Camera Raw plugin is an impressive alternative that allows you to read raw file formats from a host of camera manufacturers. There is also growing support from the open source community in recent years.
  • It usually takes more time to work with raw files. Raw files are, well, raw after all.

Now let us have a look at some pros and cons of working with Jpeg files:

Pros:
  • Smaller (relatively) file sizes makes Jpeg files more economical to store, although they seem to be becoming larger as manufacturers pack more megapixels into their camera sensors.
  • Jpeg files are easy to work with. Because Jpegs are universal, virtually any device can them.
  • Perhaps most importantly, Jpegs are ready straight out of the camera. Post-processing is optional.


Cons:
  • Not much room to wiggle. With a Jpeg file, you are left with limited room to modify the image.
  • Jpegs images produced right out of a camera tend to be of lower quality.

That being said, the choice between shooting in raw and Jpeg is entirely yours. Professionals may shoot in raw because it allows them more freedom to make corrections later. On the other hand, if you do not intend to do a lot of post-processing work, then shooting in Jpeg is fine.

I will a closer comparison between Jpegs and Raw conversions in part 2 of this article.